Tips for Starting a Successful Study Group
September 23, 2025

September 23, 2025
When you practice and teach others course material, it is easier to remember the information and recall it later on.
You’ve likely heard that study groups are a good idea, but do you know why they are? There are a few keys to making study groups productive and efficient (and not just another outlet of your precious minutes).
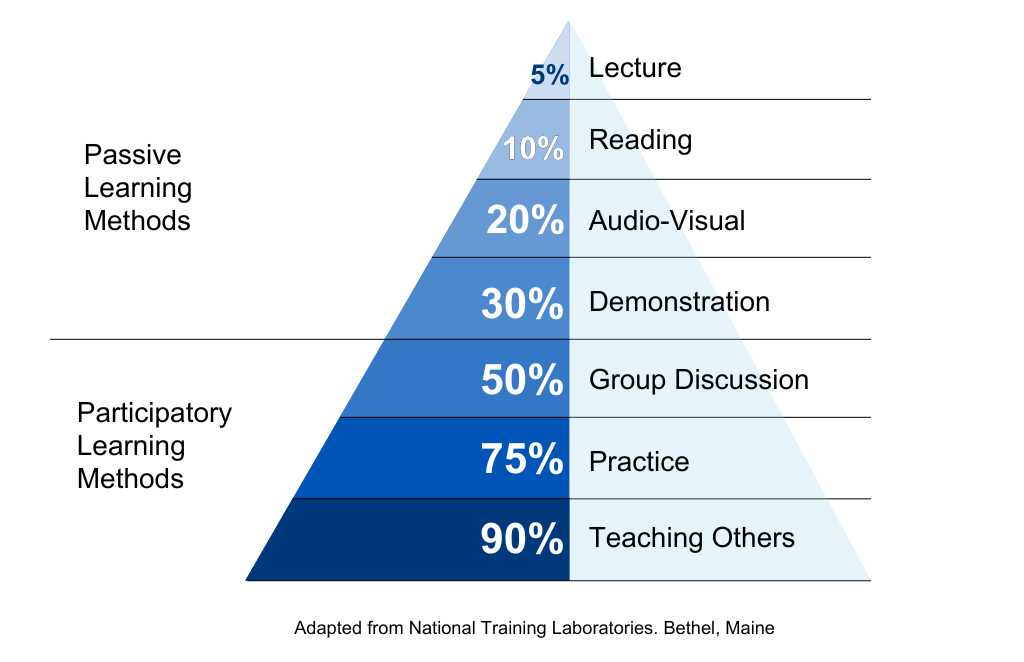
First, familiarize yourself with the learning pyramid, a diagram indicating how much information you can retain using different methods.
Students who engage frequently with course material throughout the term are more likely to do better in future courses. Here's why:
UBC Science students have told us that study groups are the number one thing that helped them do better in their courses. Here’s how you can make the most out of study time while taking advantage of the online platforms you’re already used to.
1. Find students or classmates
Point them to the learning pyramid to help them understand how it might be helpful. An effective study group consists of 3 or 4 members (no more than 5).
Ask your instructor if it would be possible for them to send out an email to connect interested students. Alternatively, set up a group on social media for your classmates to join. Many courses also offer discussion boards, whether on Canvas or Piazza. You can message any classmate you think might be interested as well!
2. Meet everyone
If you’re meeting in person, schedule a time that works for all of you. If you’re considering sticking to online meet-ups, decide on an app or platform that will work best for everyone, whether that's Discord, Facebook, or Microsoft Teams (which UBC students can access for free!). Set up your first call and make sure to turn your video on—you'll want to see everyone's face!
3. Identify goals as a group
Create an agenda for your first meeting to keep things on track. As a group, consider:
4. Figure out the logistics
Get everyone to write down:
Review your responses together and finalize what works best for the group.
5. Make sure everyone is on the same page
Though possibly awkward, make sure to discuss:
1. Teach and facilitate discussions
Lecture summarizers can teach the concepts to the group and facilitate discussions to help everyone review the material.
2. Tackle assessment materials
If there are problem sets to review, have members work through them individually either in the meet-up or on their own time afterwards; bring back questions or areas members are getting stuck for discussion at the next meet-up. If you’re really stuck, bring the problem to office hours as a group.
3. Make sure everyone is heard
Provide opportunities for everyone to speak and ask questions at each meet-up. If there are folks who are louder and those who are quieter, ensure that your meeting structure includes a time for the group to check in individually. This way, everyone has the space to offer thoughts or questions.
4. Be sensitive toward anyone having a tough time
Learning at university might feel challenging. Check in with your group to see if anyone needs additional support and, if so, help share resources we have at and beyond UBC.
5. Be kind
Whether meeting in person or online, communicate politely and make sure that everyone feels included. Use people’s preferred names (being mindful of spelling and pronunciation) and avoid assuming what pronouns they use. When communicating digitally, always remember there is a person behind the words you read on screen. Also, talk over video when you can—seeing faces goes a long way toward keeping everyone engaged and connected.
Now that you know how to organize study groups, it’s time to form one and get a leg up in those courses!
Partially adapted from National Training Laboratories. Bethel, Maine & Keep Learning UBC
We honour xwməθkwəy̓ əm (Musqueam) on whose ancestral, unceded territory UBC Vancouver is situated. UBC Science is committed to building meaningful relationships with Indigenous peoples so we can advance Reconciliation and ensure traditional ways of knowing enrich our teaching and research.
Learn more: Musqueam First Nation